Tuesday, March 7, 2017
Tuesday, January 17, 2017
Delete/List Disabled Extensions from the Cloud Service.
There are 2 steps to delete/List Disabled Cloud Service
Extensions from the Cloud Service.
- Self-Signing Certificate
a.
Create Certificate on Local machine.
b.
Upload Certificate on Classic Azure Portal.
- Run Rest API Call to Delete/List Disabled Extensions from the service.
a.
List all disabled Extensions from the service.
b.
Delete All Disabled Extension from the Service.
1.
Self-Signing
Certificate :
Self-signing Certificate will is the identity of the
signer. That is who is creating this certificate. This is signed with your own
private key to identify you.
Once makecert.exe is installed on
the machine you will connect to Windows Azure with, open a command prompt. The
command prompt may default to PowerShell, at the prompt type in “cmd” to access
Windows Shell scripting console.
Copy and paste the following to
your favorite text editor and save as a .cmd file (pick any file name you
like).
@echo off
echo This script will create an Azure certificate and export for
use in Windows Azure.
echo.
echo Computer Name
echo %computername%
echo.
echo creating folder: %SystemDrive%\certs
mkdir %SystemDrive%\certs
%SystemDrive%
cd certs
echo.
dir "C:\Program Files (x86)\Windows Kits\8.1\bin\x64"
| findstr /i "makecert.exe"
IF ERRORLEVEL = 1 GOTO ERROR
IF ERRORLEVEL = 0 GOTO CreateCert
echo.
:CreateCert
echo creating cert and placing it in %SystemDrive%\certs
echo.
"C:\Program Files (x86)\Windows
Kits\8.1\bin\x64\makecert.exe" -r -pe -n CN=%computername%-AzureCert -ss
my -sr localmachine -eku 1.3.6.1.5.5.7.3.2 -len 2048 -e 01/01/2016
%computername%-AzureCert.cer
echo.
echo.
goto end
:ERROR
echo makecert.exe file not found. Please check directory path
above or download and install the Windows 8.1 SDK from
http://www.microsoft.com/click/services/Redirect2.ashx?CR_EAC=300135395
goto end
:end
Run the script from the command prompt:
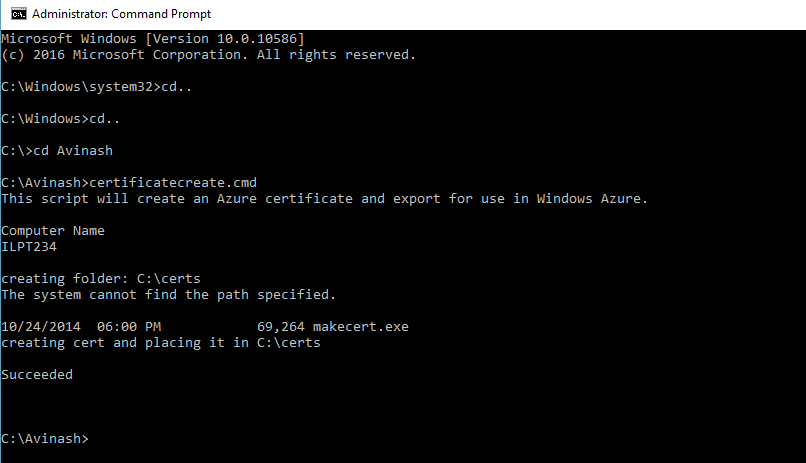
Certificate is in your \cert folder. Open
the MMC and add the Certificate add in for the local computer:
a.
Upload
Certificate on Classic Azure Portal.
Login to Azure Classic Portal, https://manage.windowsazure.com. Go
to Settings -> MANAGEMENT CERTIFICATES Tab.
Upload select the certificate you created and
copy the thumbprint and save it somewhere. We will need it later on.
2.
Run Rest
API Call to Delete/List Disabled Extensions from the service.
To LIST/DELETE you need to call rest API.
This done through Power-Shell. For both calls you need to setup the account to
the Power-Shell. Run Power-Shell with
Admin mode and Run the following command.
This will open Popup asking for your azure login credentials.
Add-AzureAccount
On Successful login this will show your
subscription id and other details.
a.
List all
Disabled Extensions.
$method = "GET"
$headerDate = '2017-17-01'
$headers = New-Object "System.Collections.Generic.Dictionary[[String],[String]]"
$headers.Add("x-ms-version","$headerDate")
$subID = (Get-AzureSubscription -Current).SubscriptionId
$CloudServiceName = "serviceNameHere"
$URI = "https://management.core.windows.net/$subID/services/hostedservices/$CloudServiceName/extensions"
$url = Invoke-RestMethod -Uri
$URI -Method
$method -Headers
$headers -CertificateThumbprint
"Thumb print pest here"
Write-Output $url.Extensions.Extension
a.
DELETE all
Disabled Extensions.
$method = "DELETE"
$headerDate = '2017-17-01'
$headers = New-Object "System.Collections.Generic.Dictionary[[String],[String]]"
$headers.Add("x-ms-version","$headerDate")
$subID = (Get-AzureSubscription -Current).SubscriptionId
$CloudServiceName = "serviceNameHere"
$URI = "https://management.core.windows.net/$subID/services/hostedservices/$CloudServiceName/extensions"
$url = Invoke-RestMethod -Uri
$URI -Method
$method -Headers
$headers -CertificateThumbprint
"Thumb print pest here"
Write-Output $url.Extensions.Extension
Useful Links:
For
your future reference and in addition to earlier notes, I am mentioning here a
few articles. Please note that these articles may or may not be related to your
current case, but good pointers for keeping them in your record book for future
reference.
- Azure Guest OS releases and SDK compatibility matrix
- List Extensions
- Delete Extension
- Create a self-signed certificate for use with Windows Azure using a Windows script
- Azure PowerShell Getting Started Authenticate with Certificate -
Tuesday, January 10, 2017
How to Get Automation Script for Windows Azure Resource?
Some of the Windows Azure Resources provides Automation Script for them. ‘Some’ means this script is not available for all Azure Resources. This automation script is ‘Static for Particular Resource’, with some minor modification in it, you can make it generic for other same type of resources. This Automation Script is available in CLI, PowerShell, .NET and Ruby Languages.
Automated Script is only available in Portal.Azure.com.
Below Example shows how to get PowerShell Automated script for Redis cache.
Below Example shows how to get PowerShell Automated script for Redis cache.
Steps to Get Script:
1. Login To https://portal.azure.com and Go to Redis cache. Select Redis cache for which you want Automation Script.
2. Go to Settings
3. Scroll Down (look for Automation Script) tag.
4. Select Automation Script
5. Select which language.


How to Set Transactional Replication for SQL Server Database?
Introduction:
This Document will guide you in setting Transactional Replication for SQL Server Database. Here I am going to guide you for the questions like ‘How to’ not like ‘What is’. If you need answer of ‘What’ in between, you can refer the Microsoft detailed documentation.
This Replication is done on SQL Server 2014 Database to Azure SQL Database.
TO DO:
A. Setup Publication for Database.
B. Setup Subscription for Database.
C. Monitor Replication.
Steps for Publication Setup:

2. Publication Database: Select The Database for which you want to set Transactional Replication.

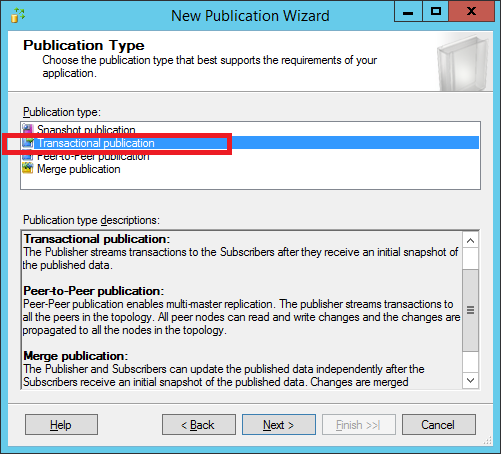
3. Publication Type: Select Publication Type Transactional.
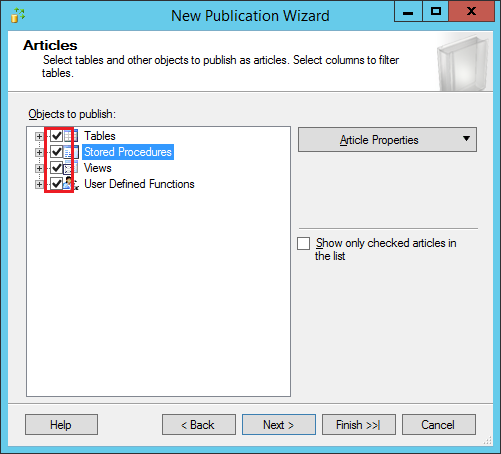
4. Articles: Select what you want to replicate from the Database. Here I have selected all.
5. Article Issues: This will show the dependent object required to access. For example if you select the Views only in Article this will ask for Table Reference as views are derived from Tables.

6. Filter Table Rows: This will allow you to exclude tables Rows from Replication. This is useful when you can to replicate the data after some date. For example if your database contains the 5 years backlog data and you want only current month’s onward update in Replica. Then you can set filter to exclude before current month data.

7. SnapShot Agent: This is one time activity. This will allow to copy the current data from database to the Replica. SnapShot Agent uses BCP (Bulk Copy Program) to copy data. You can also schedule this to run. I am selecting immediately.

8. SnapShot Security: These credentials are uses for SnapShot Agent. Select > Security Settings

9. SnapShot Agent Security: Select the Security type and enter credentials for it.

10. Script File Properties: This will allow you to script all your publisher settings.

11. Complete the wizard: This will allow you to verify all your selection.

12. Creating Publication :

13. If this is not success, check that database is enabled for Replication. If not do check Replication > Right Click > Publication properties. Check this checkbox is checked for your database where you want to set replication. And run the Publication wizard again.

Steps for Subscription Setup:
1. Login to server go to Replication> Local Subscription > Right Click > New Subscription.

2. New Subscription Wizard

3. Publication: Enter publisher name you just created and select the Publication.

4. Distribution Agent: Select Run All Agents at the Distributor.

5. Subscriber: Select Add Subscriber. I already have one so it’s showing in.

6. Add Subscriber will ask you for Credentials. Enter the Replica server credentials. I am using Azure Database server for the replica.

7. Select Database from the server where the replica will be set.

8. Distribution Agent Security: Enter the publisher login details as well as Subscriber login details.

9. Synchronization schedule: This will allow you to set schedule to synchronize the transactions. Select Run Continuously.

10. Initialize Subscription: Select Immediately.

11. Wizard Action: Select all check box and select next.

12. Script file Properties: This allows you to script all the Subscriber settings in a file.

13. Complete Wizard: You can verify all the selection in this. Click Finish.

14. Creating Subscriptions :

15. Done!! Replication is set.
Check the Replication:
You can check the replication by replication monitor. Login to publication server, Go to Replication > Right Click > Launch Replication Monitor


How to install .NET 4.6.1/4.6.2 on Azure Cloud Service Role?
Azure supports the .NET framework 4.6 and less. So if your application build around higher version of dot net like 4.6.1, 4.6.2 you need to install your target framework on the Azure Cloud Service Role.
Please follow the bellow steps to install the .Net Framework on the Azure cloud service web role.
1. Add the .NET installer to project
2. Define startup tasks for roles
1. Add the .NET Installer to Project:
i. Download .NET 4.6.1 Web Installer from here
ii. Create New Folder inside web role. Rename it as ‘bin’. Copy this installer in this folder.
iii. Do this same for all role if more than one role is present in cloud service.
iv. For worker role: don’t create the folder just directly add existing item to it and select the installer.

2. Define Startup Task and Add Install script:
A) Add Install script
I. Startup Task will run the web installer form the project to your role VM.
II. Copy the Below Code. Don’t change anything from it.
III. Save it in notepad File, Rename the File as ‘install.cmd’. Keep the extension of the file as .cmd. Copy this file to the ‘bin’ folder created inside the role.
IV. Your folder structure will look like this :

I. Installer Code to copy in file is :
set netfx="NDP461"
set timehour=%time:~0,2%
set timestamp=%date:~-4,4%%date:~-10,2%%date:~-7,2%-%timehour: =0%%time:~3,2%
set "log=install.cmd started %timestamp%."
if %ComputeEmulatorRunning%=="true" goto exit
see an out of disk space error *****
set TMP=%PathToNETFXInstall%
set TEMP=%PathToNETFXInstall%
if %netfx%=="NDP462" goto NDP462
if %netfx%=="NDP461" goto NDP461
if %netfx%=="NDP46" goto NDP46
set "netfxinstallfile=NDP452-KB2901954-Web.exe"
set netfxregkey="0x5cbf5"
goto logtimestamp
:NDP46
set "netfxinstallfile=NDP46-KB3045560-Web.exe"
set netfxregkey="0x6004f"
goto logtimestamp
:NDP461
set "netfxinstallfile=NDP461-KB3102438-Web.exe"
set netfxregkey="0x6040e"
goto logtimestamp
:NDP462
set "netfxinstallfile=NDP462-KB3151802-Web.exe"
set netfxregkey="0x60632"
:logtimestamp
REM ***** Setup LogFile with timestamp *****
md "%PathToNETFXInstall%\log"
set startuptasklog="%PathToNETFXInstall%log\startuptasklog-%timestamp%.txt"
set netfxinstallerlog="%PathToNETFXInstall%log\NetFXInstallerLog-%timestamp%"
echo %log% >> %startuptasklog%
echo Logfile generated at: %startuptasklog% >> %startuptasklog%
echo TMP set to: %TMP% >> %startuptasklog%
echo TEMP set to: %TEMP% >> %startuptasklog%
echo Checking if .NET (%netfx%) is installed >> %startuptasklog%
set /A netfxregkeydecimal=%netfxregkey%
set foundkey=0
FOR /F "usebackq skip=2 tokens=1,2*" %%A in (`reg query "HKEY_LOCAL_MACHINE\SOFTWARE\Microsoft\NET Framework Setup\NDP\v4\Full" /v Release 2^>nul`) do @set /A foundkey=%%C
echo Minimum required key: %netfxregkeydecimal% -- found key: %foundkey% >> %startuptasklog%
if %foundkey% GEQ %netfxregkeydecimal% goto installed
echo Installing .NET with commandline: start /wait %~dp0%netfxinstallfile% /q /serialdownload /log %netfxinstallerlog% /chainingpackage "CloudService Startup Task" >> %startuptasklog%
start /wait %~dp0%netfxinstallfile% /q /serialdownload /log %netfxinstallerlog% /chainingpackage "CloudService Startup Task" >> %startuptasklog% 2>>&1
if %ERRORLEVEL%== 0 goto installed
echo .NET installer exited with code %ERRORLEVEL% >> %startuptasklog%
if %ERRORLEVEL%== 3010 goto restart
if %ERRORLEVEL%== 1641 goto restart
echo .NET (%netfx%) install failed with Error Code %ERRORLEVEL%. Further logs can be found in %netfxinstallerlog% >> %startuptasklog%
:restart
echo Restarting to complete .NET (%netfx%) installation >> %startuptasklog%
EXIT /B %ERRORLEVEL%
:installed
echo .NET (%netfx%) is installed >> %startuptasklog%
:end
echo install.cmd completed: %date:~-4,4%%date:~-10,2%%date:~-7,2%-%timehour: =0%%time:~3,2% >> %startuptasklog%
:exit
EXIT /B 0
Subscribe to:
Posts (Atom)